10. Getting the model into C&C3
To test it, we can simply replace the GDI Predator tank.
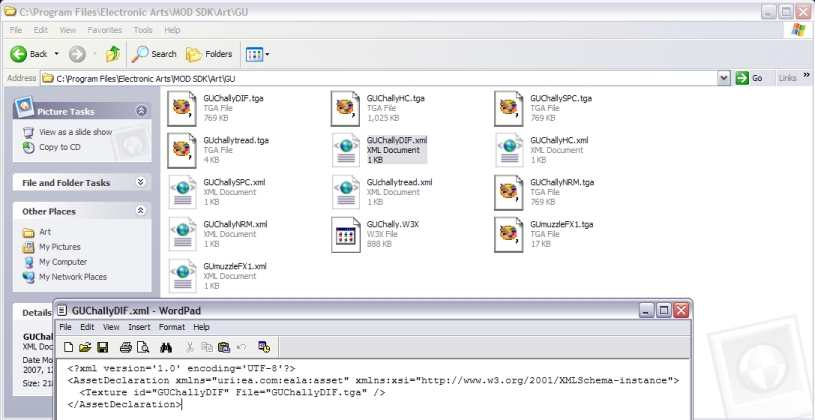
In the MOD SDK folder, there is a folder named Art. Within this folder we need to create a folder named with the first two letters of our art files, in my case GU. Inside this folder I have placed all my texture files and the w3x file for my challenger. All these filenames begin with GU. Now we need to create xml files for each texture file. These are simple files we can create in Wordpad that link the texture IDs to the texture files. They contain the following lines:
<?xml version='1.0' encoding='UTF-8'?>
<AssetDeclaration
xmlns="uri:ea.com:eala:asset" xmlns:xsi="http://www.w3.org/2001/XMLSchema-instance">
<Texture id="[TEXTURENAME]" File="[TEXTURENAME].[EXTENTION]" />
</AssetDeclaration>
Now back in the Mod SDK folder, there is a folder named Mods. Inside this we need to create our Mod folder. I'm calling mine CHALLYMOD. You should notice there is also a SampleMod folder in the Mods folder. Go into this folder and look in its Data folder. Copy the file Mod.xml. Go back to your mod folder and create a data folder and paste your copy of Mod.xml in your data folder.
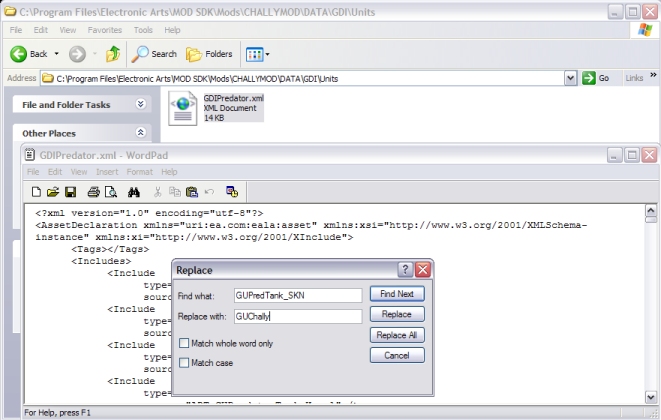
Now go back to the Mod SDK folder and look in CnC3Xml \ GDI \ Units folder. Copy GDIPredator.xml.
Go back to your mod folder again and create the GDI \ Units folders and paste your copy of GDIPredator.xml in the Units folder.
Open GUPredator.xml in Wordpad and use the replace tool to swap all cases of GUPredTank_SKN with the name you exported your model to, in my case GUChally. Save and close the file.
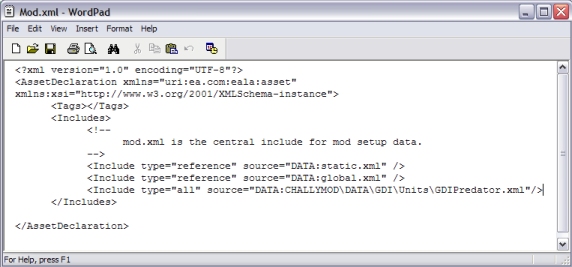
Go back up and open your copy of Mod.xml in Wordpad. Delete everything between the <Includes> and </Includes> tags apart from the two lines:
<Include type="reference" source="DATA:static.xml" />
<Include type="reference" source="DATA:global.xml" />
Under them, we need to add an Include tag for our copy of GUPredator.xml. Note the source path.
<Include
type="reference" source="DATA:CHALLYMOD\DATA\GDI\Units\GDIPredator.xml" />
Now we can build the mod. Click Start and Run. Type cmd and click Ok. Command prompt will open.
Change to your Mod SDK directory.
Type Buildmod.bat followed by a space followed by the name of your mod file. Press enter and watch buildmod run.

It's finished when you see command promt waiting for another command. Close it.
Head to the Command & Conquer 3 Tiberium Wars folder in My Documents. Open the Mods folder inside it. You will see that a folder with your mod name has been created. Inside it you will find a [yourmodname].big file.
Create a new file next to it, named [yourmodname]_[version#].skudef
Open it in notepad and type the two lines:
mod-game 1.8
add-big [yourmodname].big
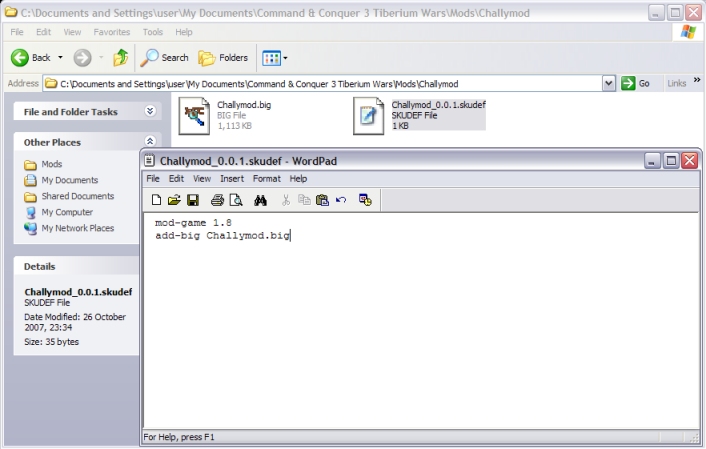
Note the mod-game line value is C&C3's version number. Update it when you get a new C&C3 patch.
Now insert your C&C3 disc. When the autorun pops up, click the Game Browser button and go to the mods tab. Select your mod from the list and click the Launch Game button.

Congratulations. From now though every time you wish to make changes to your model or textures, you will need to go through the buildmod process again.
Previous | Next
 - all rights reserved.